7 Easy, Fun & Incredibly Adorable Nativity Scene Crafts for Kids
For centuries, the nativity scene has been part of the Advent and Christmas tradition, serving as iconic decor and honoring the blessed birth of our Lord and Savior, Jesus Christ. From our perspective, the nativity scene can also serve as a fantastic teaching tool, helping us tell the story of the magical birth to our children.
Using a keepsake nativity scene set can certainly do the trick. But for those who want to create a more hands-on experience for their families, there’s no better way than through crafting. And to inspire your efforts, below we share some of our favorite nativity scene crafts.
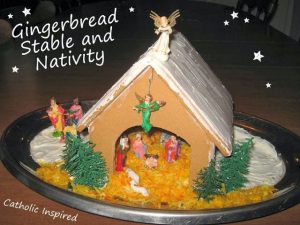
1. Edible Gingerbread Stable & Nativity Scene
Speaking of Christmas traditions, making gingerbread houses are a childhood favorite for many of us.
So, what better way to intrigue and inspire your kids than to turn your gingerbread-house-making extravaganza into one with deeper meaning?
Catholic Inspired, which is run by Jennifer Marie Lawrence, offers a great example of a finished gingerbread nativity scene.
Using a ready-made gingerbread house kit, all you need to do is carefully cut an arch in one of the side walls and assemble to create your structure. From there, put some shredded coconut into a sandwich bag, add a couple drops of food coloring, and shake; this will serve as the hay. Finally, use plastic figurines or printed paper figurines mounted with frosting to complete the scene.
Of course, as you create, tell your kids the story of Jesus’ birth and the role each of your characters played that beautiful day.
(Image Credit: Catholic Inspired)
2. Clothespin Nativity Scene with Popsicle Stick Stable
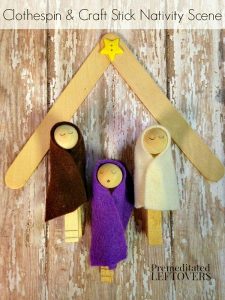
If you’re looking for a nativity craft that is perfect for tiny hands, then this clothespin and popsicle stick nativity scene craft from Premeditated Leftovers is perfect.
According to the tutorial author, Katie Femia, the supplies, all of which can be found at your local craft store, needed include:
- 3 wooden clothespins
- 3 wooden doll heads
- Assorted crafting felt
- 1 star button or yellow button
- 2 wood popsicle sticks
- Scissors
- Pencil
- Hot glue and glue gun
For the nativity figures, you’ll start by gluing the heads onto the clothespins, which you should hold in place until you’re sure they’re secure. Then cut three felt strips in colors of your choice, wrap them around the heads like a bonnet, and secure with a dab of hot glue. Then using your pencil, draw the faces on the heads.
For the stable, simply glue popsicle sticks together in a “V” shape and glue the button to the middle. Easy peasy.
(Image Credit: Premeditated Leftovers)
3. Rock Nativity Scene
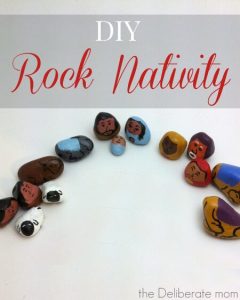
If you’re looking for a low-cost, highly artistic, and adorable nativity craft for kids of all ages, look no further than this tutorial from The Deliberate Mom.
All you need is an assortment of rocks, acrylic paint, paint brushes, and a protective sealant spray.
Get started by giving the rocks a good wash. According to Jennifer, owner of The Deliberate Mom blog, you should make sure to let the rocks dry for a full day before painting.
Once the rocks are dry, start painting. When you’re finished, set them somewhere to dry for at least 48 hours. Then spray them with your sealant, preferably outside or in a very well-ventilated area.
(Image Credit: The Deliberate Mom)
4. Wooden Peg Doll Nativity Scene
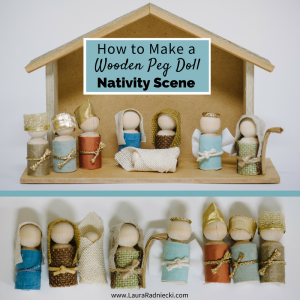
If you’re looking for a nativity scene craft that’s pretty easy, cute, and durable — you know, some of those “musts” when you have young children — this adorable wooden peg doll nativity scene could be the ticket.
Blogger Laura Radniecki does a wonderful job walking you through this tutorial, providing a supply list and breaking it down by each of the characters.
She suggests that you start by rounding up fabric scraps, ribbon, and twine. This will help you visualize how to dress each of your figures.
(Image Credit: Laura Radniecki)
5. Toilet Paper Tubes Nativity Scene
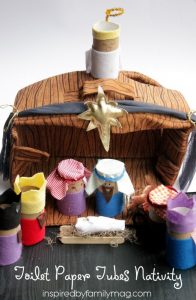
Toilet paper tubes are a low-cost and easy to use crafting item — and a perfect fit for creating a nativity scene.
In this tutorial from Inspired By Family, the only supplies you need are: toilet paper tubes, craft glue, scrap fabric, pipe cleaners, and popsicle sticks.
The toilet paper rolls serve as the bodies, the scrap fabric provides the clothing, pipe cleaners are a headdress accessory, and the popsicle sticks can be assembled into Baby Jesus’ cradle.
From an educational aspect, the blog author says this could also be used as an Advent calendar of sorts.
“Each day bring out a person from your manger and share a verse about it,” the author writes. “For example, start with the angel and then talk about how the angel came to visit Mary.”
(Image Credit: Inspired By Family)
6. Nativity Scene Handprint Art
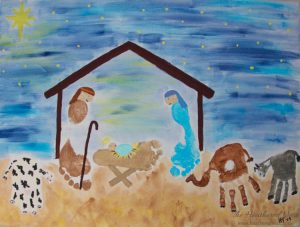
A classic kid crafting technique is using handprints and footprints in fun ways to create a special keepsake.
This nativity scene handprint art project from The Heathered Nest helps you do just that.
It’s pretty simple. All you need is a canvas or art paper, paint, paint brushes, and your children’s hands and feet.
Dip their feet or hands in the paint color of your choice, apply them to your paper or canvas. Use their hands create animal bodies and their footprints to create the bodies of Mary and Joseph, as well as Baby Jesus’ bed. Then use your own artistic freedom to finish the figures, fill in the starry night, and finish the scene.
(Image Credit: The Heathered Nest)
7. Printable Nativity Finger Puppets
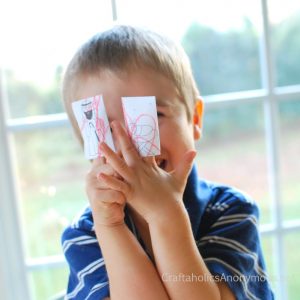
If you’re looking for an ultra-easy craft, these free printable nativity finger puppets from Craftaholics Anonymous is the ticket.
All you need to do is download the free template and print it. Then let your little person color each of the characters. From there, cut each of the figures out, fold along the helpful dotted line, and then tape the two long sides together leaving the bottom open for fingers. That’s it!
Of course, as you make and play, consider reading from the Bible or another seasonal book to instill the true reason for the season.
(Image Credit: Craftaholics Anonymous)
Bonus: Starry Sky in a Bottle
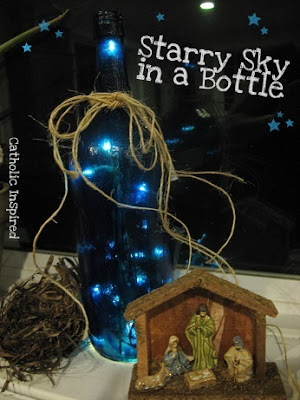
The Star of Bethlehem is an important fixture within the nativity story, inspiring the wisemen’s journey to Jerusalem to meet the newly born King.
This starry sky in a bottle craft from Catholic Inspired can help your family set the scene over your nativity set.
The supplies you’ll need include:
- Bottle (i.e. a large wine bottle)
- Set of battery powered lights (10-20 sized set)
- Mod Podge
- Blue food coloring drops
- Disposable bowl
- Paint brush
- Wood skewers (optional)
- Twine or ribbon (optional)
- Wax paper (optional)
Get started by pouring about a half a cup of Mod Podge into your disposable bowl. Then add about 10 drops of food coloring and mix until the color is even. According to Jennifer, if you’re using a large bottle, you may need more.
Then stand your clean bottle onto wax paper and start brushing your mixture onto the bottle; Jennifer suggests brushing from top to bottom. Let the bottle dry and then determine if it needs another coat. Add your lights and then use twine or ribbon to adorn the neck of the bottle.
(Image Credit: Catholic Inspired)
Want More Advent and Christmas-Themed Tutorials or Crafts?
Then check out these helpful posts: